Panorama photography tips: look through a broader lens

When shooting landscapes, architectural monuments or urban landscapes, even the most wide-angle lens, especially with a camera with a crop factor cannot give such a vision and the presence effect, which is achieved when using a panorama. Moreover, since the panorama consists of several pictures are taken to your n-megapixel camera; so the final image will be more detailed than the same scene shot in one cadre.
This is the bottom for such superdetalization of the largest photo in the world. In this video, a professional shooter will tell you his method of photographing the panorama “The simple way to shoot a panorama photograph”
we hope that your desire to shoot the panorama has only intensified, so we'll figure it out in more detail.
Basics concepts of the shooting panoramic photos
So, let's get started! To create a beautiful panorama, we need a series of shots, so let's check into the matter how to take photos and prepare them for the making a panorama, because that's what determines the quality of the final photo version.
1. Where to start? As always, we begin with the artistic conception. Imagine the composition of the future snapshot: select the object, the front plan etc. The complexity of panoramic photographing is that we cannot see the final cadre right through the object-finder or on the camera screen: there only its fragments, from which the panorama will be collected. Therefore, for such a footage it is very important to develop a special skill to see the finished cadre without the help of a camera. Note for yourself the boundaries of the future snapshot: what will you prefer to include or left beyond its boundaries. A mental plan will help to effectively act further, and not just click the camera in all directions, trying to take a picture with the greatest possible viewing angle. The lack of a thoughtful composition is the main problem of most panoramas made by beginners, so carefully consider your future shot before you start shooting!

Richard Brevik
2. Use a tripod. A series of photos for the panorama should be taken on the tripod, at least it is highly desirable, since in this case the correct viewing angle will remain and it will be easier for you to control the overlap of cadres. It's great if your tripod has a level that will help you in setting the right level and not to get the tilted horizon. Added to this is the fact that this device will allow the shooting panoramic photos with the long-term exposures. This is especially important if the foreground is situated near to the camera (most commonly).
3. For making a panorama picture, it is necessary to take photographs with overlapping by about a quarter, i.e. do not even try to merge the footage “by eye”, the special program will do it for you. At this stage, you just need to give the program space for hard cut, so it's better to make more overlapping cadres than to be faced with the fact of a missed or incoherent object in your panorama.
4. Use the same focal length for all pictures in the identical panorama series. And it is desirable, if possible small, to give a greater coverage of the scene.

Kaj Bjurman
5. Do not change the exposure, better yet the parameters – aperture, shutter speed and photosensitivity – remain the same levels when photographing the entire series for the panorama. To do this, switch to manual photo mode and, after finding the appropriate settings in the how to take panoramic photos DSLR manual, do not change them. Otherwise, you can get a panorama with different areas – lighter or darker, more or less noisy (if you, for example, changed the photosensitivity on the go), and so on.
6. Photograph in manual focus mode. The auto focus on different cadres will focus on different objects, which will lead to the fail in the final version: illustrate, in one part of the panorama there will be a nearby bush in focus and in the other – a distant hillock. The human eye unconsciously will immediately notice also how easily we can determine how much and tastelessly high end retouching before after was used for a photograph in a magazine. Therefore, when taking a panorama, we do next thing: in the autofocus mode we focus on some object, taking into account that the focal plane will be preserved on all other photographs, we transfer the lens to the manual focus mode and keep taking pictures.

Richard Chesher
7. Another useful tip, once subtracted from Scott Kelby's “Digital Photography”, take a picture of your finger before you start taking a panorama and two fingers after the last cadre. Or simply close the lens with your hand to get a black shot that will help in all the series of more or less the same cadres quickly find this series for a panorama.
8. Take a picture again! Just in case, especially if you edit and patch your panorama shots away from this photographed place.
This type of panoramic photography means a photo glued from several frames. How to glue cadres, we will not describe in detail, because there is a huge variety of applications that do this automatically. If you install Adobe Lightroom or the latests versions of the Photoshop, then there is this function. As for example, the PTGui program does not require special skills, you need just two clicks to glue the panorama.
What the panoramic photography equipment you required?
Professional photographers utilize a panoramic camera or a flight head for a tripod. This photographic technique is not low-price, so most amateur photographers take panoramas with an ordinary DSLR (or a P&S camera if there is a manual mode) or even know how to take a panoramic picture on Android on high level. The lens is suitable for anyone – prime or zoom (zoom gives great opportunities, but it's more difficult to configure). A tripod is not necessary, but for a good result it is still indispensible. If there is no tripod, and no purchase is planned, try to shoot manually. Light filters are not used when shooting panoramas.
Although the concept and technique of panoramic shooting is simple enough, it confuses many photographers. Most often, photographers have questions about what specific panoramic photography equipment is worth buying for shooting great panoramas. And this, of course, is one of the commonly misbelieves about this style of the photography –all around, you once in lifetime remember that you bought such equipment! Although let's figure it out.
Mark Gray
Let's begin with the misguiding – the necessity of using a panhead during panorama shooting. Many shooters argue that its availability for taking panoramas is simply necessary. In fact, the tilt head is needed not until then the objects are placed close to the camera at the close-up view, or if you apply a shooting technique that is different from the rotation or panhead of the lens. Thus, it is easy to photograph a big panorama without appropriate devices.
It has been said that the panoramas can be shot only with lenses with a focusing length of about 50 mm, since these images have the least promising distortions and it's easier to put them together later. This is only true if you are going to glue the panoramas manually. However, today no one does it (this is as rare a phenomenon as the leechcraft). For the automated gluing of panoramas, many computer programs have been created. The lens for taking panoramas should be chosen based on what genre you will be shooting. Here everything is as usual: wide-angle lenses are more suitable for a landscape, and for a portrait it is better to use special portrait lenses and for the last one apply high end portrait retouching to remove gaps. And the requirements for optics when shooting panoramic photos are all the same as when shooting ordinary single cadres. It should not give vignetting, distortion, chromatic aberrations. An important requirement for the lens, which will be used when shooting panoramas, is sharpness throughout the entire cadre (at least on closed diaphragms). Many lenses spoil the image by sharpness only in the center of the cadre, and around the edges you get unclear colors. Such lenses are poorly suited for panoramic shooting, because what was the edge on one of the glued pictures may well be the center of your future panorama.
In view of the above, we recommend using optics optimized for modern quality standards when shooting panoramas. Save monocles and “helios” for other types of shooting. Among the photographers, the Nikon AF-S 18-35mm f / 3.5-4.5G ED Nikkor lens is popular, and sometimes the Nikon 85mm f / 1.4D AF Nikkor or the Nikon 70-200mm f / 4G ED AF-S VR Nikkor.

Thomas Fitzgerald
To ensure the entire footage taken for the panorama will good, it should be taken from one point. Constant point of shooting will be provided by a tripod. In addition, when taking panoramas, a tripod is needed precisely for the same reasons as for a conventional photographing, for example, a landscape. After all, often you have to take pictures on long exposures. Which tripod is suitable for panoramic shooting? You can use any type. The main requirements are reliability, stability and convenience. Some believe that taking panoramas is impossible without a special tripod head. This is not true. The panoramic tilt head (as well as a more simple device – a nodal bar) is not always necessary. It is used when the front plan lies close to the camera, because in these cases it is necessary to cope with the phenomenon of the parallax effect.
The panoramic style of the photography has many advantages – it is the ability to change the viewpoint, increase the resolution of the image for ultra-detailed and detailed printing. Over time, you will pick up to find places for panoramic shooting, anticipate lighting conditions, and quickly prepare equipment for shooting one-row or multi-row kinds of the panoramas. As soon as you begin to try your hand at this photography technique, you will immediately understand which panorama photography tips suit you and which ones do not.

Chris Hill
Which panorama head should I choose? If you are seriously aiming to take a bulk of panoramas, or if you are an architectural photographer, usually coping with objects in the front plan, then you will undoubtedly need a quality panoramic tilt head. And the investment in its purchase will be fully justified. When it comes down to such shooting, you can easily spend less than $ 50 for a conventional panhead and over than a few thousand dollars for a new motorized device. The market offers tripod heads of various creators: Nodal Ninja and Bushman Panoramic, GigaPan or Really Right Stuff, devices by Kirk Enterprises and also heads by Agnos, Novoflex and host others.
If the size, weight and price of the panoramic photography equipment is not a problem for you, because you are going to earn selling photos of the size of a wall to different magazines and get to the “List of the Best Advertising and Commercial Photographers”, then you can look at full-size panoramic heads, such as Nodal Ninja Ultimate M2 (price about $ 700) or Nodal Ninja Ultimate M2 Giga (the price is about $ 1000). In our opinion, the use of such tripod heads in the field is not very efficient, as they not only add weight to your photobag, but as well occupy a place in it and in luggage room during travelling.
In short, shooting and image blending requires a plenty of your precious time and forbearance, so get ready yourself that you come up with many difficulties upon the path.
Put on notice these panorama photography tips
It is common to call a panorama a photograph collected from several cadres using special programs. In order to easier to glue a panorama in a graphics editor, you need to follow simple rules when shooting it.
1. From the greater part of the problems connected with “camera shake” and wrong camera movement during shooting, you will be saved by an old kind friend – a tripod. If there is no tripod, you will need to practice and acquire some skill. But for some types of shooting, for example, at sunset or at dawn, when shooting panoramas of rooms you will not be able to get high quality pictures without using a tripod.

Mark Gray
2. Set the white balance on the camera to one of the presets suitable for the lighting. Or, if there is a large gray card, make a manual setting. This will avoid problems with different color shades of cadres, which makes gluing a panorama often impossible.
3. Adjust the optimum exposure for this scene. It is desirable to measure the exposure in the aperture priority mode, then, after making several test shots in the M mode, adjust the shutter speed more precisely.
4. After focusing on the sharpness, turn off the autofocus. If this is not done, with the following cadres the camera can focus not where it is needed, for example, in the foreground. As a result, the gluing of the panorama will be impossible.
5. Take pictures quickly, otherwise some objects, such as clouds in the sky, can change their position, which will lead to defects in the panorama.
6. When shooting, make sure that each cadre overlaps the previous one by about a third. Then it will be easier for the program to compile a panorama. This applies to all types of panoramas – horizontal, vertical, combined, spherical.
7. Shoot in portrait orientation and zoom in for more detailed panoramas.
8. Every time before you start to take a panorama, make a “backup picture”, including the scene that you are going to take pictures. This will allow you not to stay empty-handed, if something goes wrong with the panorama, and the conditions for shooting were ideal.

9. After taking the necessary number of frames, proceed to the next step – assembling or splicing the panorama in the graphics editor.
10. Another tip is to avoid taking panoramas at too wide focal lengths. If you shoot with a wide-angle lens (especially one that greatly distorts the image), you usually not only add too much debris to the scene (empty sky, too many foregrounds, etc.), which will result in loss of resolution from - the need for framing, but also potentially add distortions when stitching panoramas. I believe that focal lengths in the range from 35 mm to 70 mm on a full frame (24 mm - 50 mm on cameras with APS-C matrix) are optimal for shooting panoramas. When shooting panoramas consisting of several lines, you can use even larger focal lengths, which will allow you to get even more detailed images.

If you like a quick result, then the panorama can be done on the move without special preparation. But there are significant limitations on quality. To achieve the optimal result, make several vertical frames with a good intersection, at least 50%. Vertical frames are more convenient, because you will lose in resolution when gluing because of the fact that removing from your hands, you cannot turn exactly. Then in the editor it will be necessary to adjust the brightness of the frames, because in all frames it will turn out slightly different due to automatic exposure. To simplify the task and the panorama did not turn out to be spotted; we recommend that you fix the exposure with the AE-L / AF-L button. Here you can also turn on the HDR mode, which will give more saturated colors to the image, for example in the article “HDR as new trend in portrait photography” you can see how this effect is displayed on the faces of the models.

James Grant
Programs for automatically splicing panoramas. So, you shot a few cadres and want to glue a panorama from them. Simple alignment in the photo editor will not give the proper results - joints will be visible. Panning a panorama is not a simple task, it's easy to automate, unlike skin retouching online, where careful human intervention is necessary. There are many special programs created for automatic pasting of images. Perhaps the most famous of them – are PTGui and Autopano Giga. Very well knows how to glue panoramic frames to everyone known Adobe Lightroom (starting with version 6). At the same time, it can glue panoramas directly from RAW-images, creating a panoramic RAW-file. This allows you to continue to work with a panoramic image as a normal RAW, applying to it all the known methods of processing. Among free solutions, you can select the program Hugin and the brainchild of Microsoft – Image Composite Editor.
We hope that these tips will help you in your upcoming panoramic shoots.
James Grant
How to take panoramic photos DSLR?
Many cameras (P&S camera, DSLR or DIL cameras – it does not matter) also allow you to shoot a panorama in automatic mode. In cameras of different manufacturers, only the way to activate the panoramic mode differs. But only with a DSLR camera you will feel confident when shooting: it will allow you to adjust all the parameters and give a high quality picture. In addition, the DSLRs do not have a delay when the shutter is triggered (the so-called shutter lag), which means that the panorama will be shot much faster and less likely to make a mistake. Note that in the Nikon SLR cameras there is no built-in automatic mode of panoramic shooting (serious photographers are not interested in it, because if you deal with a reflex camera, you can compose the panorama yourself), but if you want to make money on your shot, then pay attention to professional panoramic photography equipment such as Insta360 Pro. If you are an amateur photographer and want to fiddle around with panoramas, you can pay attention to the Canon EOS 350D Kit, Nikon d600 and others.
The finished panorama will be stored on the memory card – the same place where all your other photos. In expensive and professional cameras, a separate panoramic mode may not be available. It is assumed that the professional himself knows how to take panoramic photos of DSLR and process the panorama.
Deng Songquan
It should be taken into account that in the panoramic mode, the camera makes a series of individual pictures, and then combines them into one. And if you understand this principle, some artifacts will not surprise you. For example, if a bird enters the frame during the shooting, then there may be several birds on the final panorama. Therefore, try to make panoramas so that in the cadre there are no moving objects – people, cars, animals and other things. Another important point is try not to make panoramas where there are strong brightness differences – the camera measures the exposure on the first element, so that when the level of illumination drops, a part of the panorama may turn out to be too dark (up to a purely black color) or completely crossed. You cannot fix this in the photo editor in most cases.

Smartphone is a mini photo studio or how to take a panoramic picture on Android?
The camera of a modern smartphone differs little from a good digital camera. Manufacturers are trying to improve their creations, using the latest technical equipment. Having in the pocket a small photo studio, many are thinking about creating panoramas. There are so many beautiful places around, which do not fit into one small picture. However, without the experience of creating panoramic photos, the result is a gluing out of ordinary pictures, which is a shame to show. But to learn is never too late, so we will give you a pair of panorama photography tips.

The advanced smartphones on the Android can make panoramic photos. Panoramic photography on Android is associated with taking panoramas, i.e. taking pictures at a large viewing angle. In most Android-based phones, panoramic shooting is a part of the functionality of a standard camera. But for convenience, applications have been created that make it easy to create a panoramic picture on Android. Let's get acquainted with the applications for panoramic photos and how to take a panoramic picture on Android platform closer.
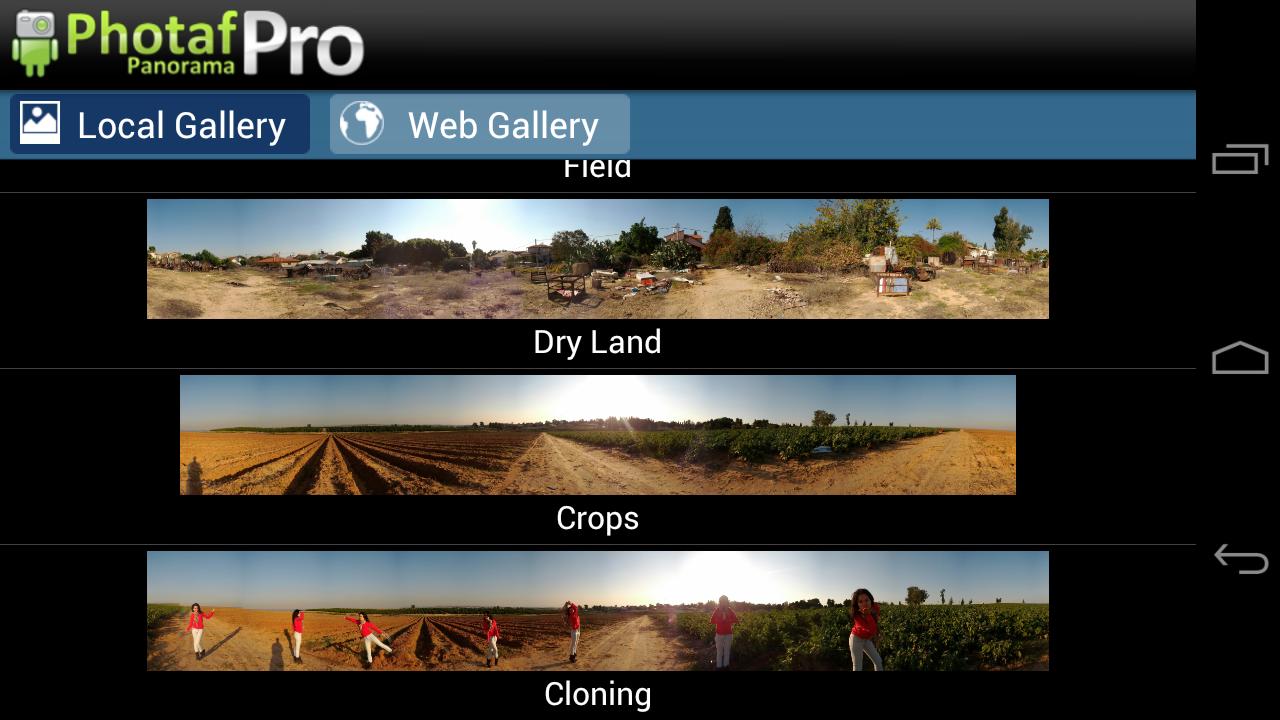
PhotafPanorama is the most popular program for panoramic photo on Android. The interface of the application is extremely clear, but the presence of a huge number of buttons slightly disorients the user. PhotafPanorama will automatically create a panoramic image, and the correction will be made using level indicators. In the settings, you can change the white balance, adjust the exposure, turn off the autofocus and make minor changes. About the capture of the image the program will notify with an audible signal or vibration. Image preview is carried out in 3D mode, you can work with the image by touching the screen. In this mode, you can slightly correct the image by pressing a certain button. Photaf has an online gallery where you can lay out your pictures, as well as get acquainted with the work of other users. You can download the simplified version of the program for free, but the purchase of the full version is a paid pleasure.
Pano differs from its fellows in that the interface of the program is extremely simple. An application for panoramic photos for Android can easily be used even by an inexperienced user. Minimalism also shows itself in the functional component of the program: in the settings it is possible to adjust only the inclusion of geo-tags. The application is able to put together an unlimited number of images, while the quality remains at a decent level. At the end of the splicing you need to click on the check mark in the upper right corner, after which the program will form the panorama you have taken. The ready-made work can be published in a social network or stored in the phone's memory. Note that Pano does not have a free version and has its prices, as in the case with any quality photo processing service, where there are set photo retouching prices.

WondersharePanorama. The interface of the program differs from Pano and PhotafPanorama in that WondersharePanorama uses two large sections: a gallery and a snapshot. The program takes the golden mean of the functionality: here and the flash can be adjusted, and the filters on the photos used. Go to the gallery with one touch, which saves time. The application does not require reusable pressing of the shutter button: WondersharePanorama will automatically take ten photos, and then glue it. The result of the work will be displayed, where the user can save, publish or delete the panorama.

Now that you have some knowledge, you can easily create panoramas. Be braver. The more you try, the better you will get. Moreover, modern smartphones are small photolaboratories in your pocket, not to mention expensive DSLR cameras. A little effort and you will not believe your success. Just do not forget our advice and you will succeed.
Share the article with your friends!

Vote for the article
Average rating:
|
| Use your Facebook account to add comments |
| Add a comment via Disqus: |