How to edit underwater photos in Photoshop – tips and peculiarities

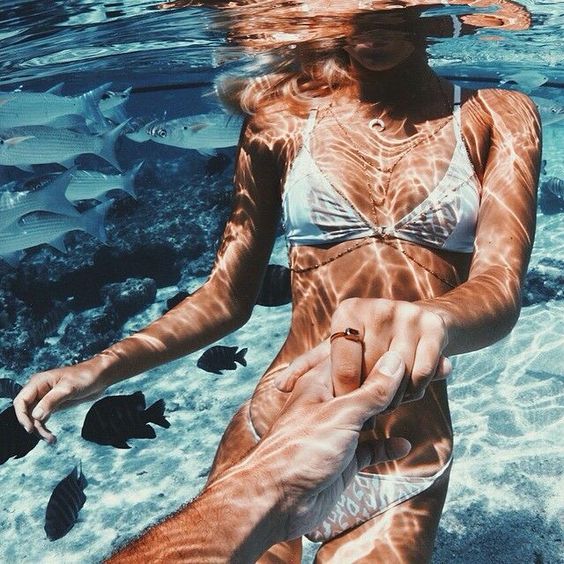
In modern world of technologies and highly developed computerization people are tend to have quite busy life style. Nevertheless, we all try to find some time for our hobbies. Every day we create something new or extraordinary, we want more and more pleasant or even incredible feelings, and naturally we may speak here about scu-ba diving or just activity of swimming underwater without special equipment.

With the appearance of waterproof action cameras, we may think that people would like to capture such a moment as it is really something uncom-mon. Then we have some questions – how to photograph well and how to edit underwater GoPro photos?
Abigail Ferreira
Thus, photographers are sure to make their best to shoot amazing underwater pictures and, of course, such snaps need quite o lot of postproduction. To have pictures of the highest possible quality it is necessary to know how to edit underwater photos in Photoshop. That means first of all to adjust the white balance, contrast, to get sharp-ness and flamboyant colors, etc. High end underwater retouching is also possible if specialists understand how to edit underwater photos in LightRoom.
The first thing to be said about underwater photography retouching is that before everything else such photo-graphs need to be made with the help of professional photography gear, as for instance GoPro cameras. It is not that easy to work underwater and find the right technique, especially for those, who don`t have much knowledge about underwater photography, but it is more pleasant to enhance the photo quality than to fix something in a picture with the help of professional soft and hardware. That is why it is useful to keep up with times and be aware of TOP 5 - Best Tablet for Photo Editing.
The working process of photo retouching. What steps should I take first?
The crucial thing in terms of a successful working process of photo retouching is the order that is carefully and neatly arranged photo library. Thus, photo retouching process will be less difficult and time consuming. You should be able to find your pictures at once otherwise it would be a mess. So, to know how to edit underwater photos in LightRoom you should first create photo library.
 Caleb Kerr
1. You need a particular folder arrangement of pictures, the one that would be appropriate personally for you. Fol-low this structure and this will help you to know where the pictures are.

2. After you had imported the pictures, look through them quickly in order to choose selects and liquidate bad and poor shots.
3. To arrange and then rate the pictures you may use different icons, markers or keywords. That will help you to find pictures quicker and to feel how to edit underwater GoPro photos better.

4. The next thing is so-called global or general adjustments using local tools. Use Camera Calibration, make adjust-ments in the Basic panel, don`t forget about tweaking colors with HSL to show how to color correct underwater photos, and of course sharpen and crop the photos.
5. Make now more directed adjustments using local tools. These are Adjustment Brushes, Graduated and Radial Filters that work on the picture selectively.

6. To understand better how to edit underwater photos in Photoshop try your hand at a “round journey” to this program. It means that you quickly change Lightroom to Photoshop for some time and then return back to . In Photoshop, for example, you may work in layers.
7. You send the photos to your clients. If these are your pictures, print them or share with friends and they will see that you know for sure how to edit underwater GoPro photos. You can also boast samples demonstrating high end retouching before after.
 8. Prepare a second copy of your photo library and Lightroom catalogue.
Photoshop Plugins
To deepen your understanding how to edit underwater photos in Photoshop it is important to say a few words about Photoshop plugins. These tools – Topaz DeNoise and Topaz Detail – help to make the process of postpro-duction a little bit easier. They can be a helping hand, but of course not only these plugins contribute to the re-touching of underwater snaps. If you don`t have a burning desire to work with Topaz DeNoise and be more aware of question how to edit underwater photos in LightRoom you may reduce noise in the photos using noise reduc-tion tools.

However, you should take into account not only the noise reduction, but also keep in mind that you need to make denoise modification before you try to add some contrast and detail. Otherwise, you just give the contrast and detail to silt, backscatter in water and all the spots. In such a way you give them even more prominence but don`t hide.

If we are speaking about Topaz Detail you may substitute it with the technique of high-pass filter. Furthermore you can easily combine Clarity (Lightroom) and Smart Sharpen (Photoshop) to get something identical. But it is a more complicated way to achieve the aim that is why it is more practical to use the above mentioned Photoshop plugins. Besides, with the help of these plugins you are likely to get photographs retouched at a more advanced level and this work can enrich your knowledge on how to edit underwater GoPro photos.
What is more, you may broaden your horizons reading about Peculiar features of high end fashion retouching: talent to make high-end profile photography.
How to edit underwater photos in Photoshop
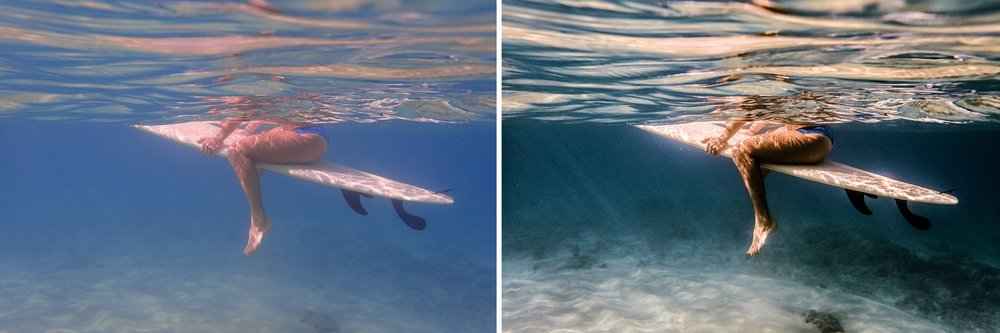
Having edited a raw file you bring it into Photoshop for further editing and retouching. First of all you need to pay close attention to colors and that is why it is important to realize how to color correct underwater photos. Thus, adjust Levels (red, blue and green), then fix hue and saturation, tweak highlights and shadows, choose the right contrast and brightness, use some Clone tools, if needed. To repair some drawbacks you may apply Healing tools and remove silk, specks, scratches or some dust. You may also use an Unsharp mask. These operations seem to be not very difficult, but you need to consider the process of high end retouching very carefully. The same can be said about the other types of post processing, as for instance, skin retouching online.
Enhance the contrast. A most essential thing that you can enhance in your underwater photos is contrast. Since the photographs made underwater, it is natural that there can exist some problems with this item. Water just sometimes sucks it out. Here you need to apply Level tools and then draw slowly the upper right and left sliders in the middle till the picture looks well. Then correct brightness and contrast with the help of corresponding tools. After that don`t forget to increase saturation slightly.

World Adventure Divers
To answer the question how to color correct underwater photos it is necessary to enhance color balance. If underwater photos made without a flash or manual white balancing, you may use levels in Photoshop. Be-sides, try to adjust red, blue and green color channels individually. In such a way you may edit photographs shot in shallow water. You may also see too much noise and grain in red channel, but it is ok, since there is no much data in it.
One more important thing in terms of the underwater photographs is the white balance, since in most cases it is very blue. You might have thought that you can try your hand at some white balances and if you don`t find the one you need, the game is over. But it is far from it. All you need is to go to the Lightroom basic panel and choose the white balance picker tool. Then choose the light blue of the water and after that the picture is going to be warmed up. However then you need to use graduated filters to have the white balance set.

In case you don`t feel happier working with the Lightroom white balance tool, you can open a picture in Photoshop (as a smart object) and use camera raw smart filter. You will get new white balance sliders so that you can change the adjustments and make the picture look more distinguished.
Reduce the hotspots. A hot spot is a small part of a photograph that is much brighter than the other its parts. It may also have highlights. To get rid of the hotspots you need to lower the luminance of the yellow channel with the help of Photoshop. Therefore you reduce the unpleasant light of hotspots.
 Eliminate backscatter. For this job Photoshop has quite a lot of techniques and tools. The only limit is your time, efforts and desire to spend time editing your images, since the process of post processing is complicated. High end portrait retouching, for example, requires great deal of work and professionalism. But if the backscatter, dust or scratches are ok, just lasso the necessary part and apply the tools that remove spots and dust. If the backscatter isn`t that so small, you may com-bine the use of the healing brush, the spot healing brush, the patch tool and the stamp tool. It is also possible to use the clone tool to remove bubbles or some unwanted algae.
Here some words about Photoshop tools should be said.
As for the spot healing brush it is one of the easiest tools to use. You just click on the part of an image that needs repairing and then it selects pixels automatically near the area around the brush to blend. In case the results are blurred, you need to use just healing brush. In such a way you match texture better and more professionally.
 If you need to apply the healing brush, click alt on the targeted part, after that paint over the pixels that have to be repaired. Using the healing brush you won`t get to know how to color correct underwater photos, but as for the texture, shades, lights and transparency it is very useful tool. In order to match the texture and level the edges precisely, you are welcome to use the healing brush.
 In case of the Patch tool it helps to fix bigger parts with pixels of the other part having similar size. Firstly you should contour the part of a picture that needs repairing. Then click the mouse with the patch tool inside the se-lected area and draw it to the clean part. The time you release the button, the original pixels will cleaned with the pixels from the selected part. The task of the Patch tool is to make spot removing quicker when you have removed big amount of backscatter in the picture, and are able to use pixels from the clean part. In the options of the patch tool you can find structure and color sliders (in case you apply the tool in content aware mode)that can fine adjust results the moment after the patch is finished.
 To copy pixels from one part of the picture to another you need to use the clone stamp. Just click alt on the select-ed part that to your mind has to be cloned. Then draw the stamp tool to the part you want to repair and paint. The clone stamp can be easily used in case you are not eager to work with the healing brushes.
 To understand better how to edit underwater photos in LightRoom it is possible to eliminate backscatter using this editing software. There is no magic stick that will help you to get rid of spots and that is why it is required to be techniques savvy. If you want to work with Lightroom you may use only the spot removal tool. So, you just draw over the part that you need to remove, and the tool chooses automatically the part of a picture it heals from. In case you are not satisfied with the results you can always choose the other part of an image by yourself. The spot removal tool is rather useful and can be really a helping hand while removing spots but this process is usually tire-some and even exhausting.
Having read the article you may see that the process of underwater photography retouching can be challenging and sometimes tiring. But you may always find specialists that can help you with any type of high end post pro-cessing. Our team can offer you the high level of professionalism, reasonable photo retouching prices and pleasant communication.
Share the article with your friends!

Vote for the article
Average rating:
|
| Use your Facebook account to add comments |
| Add a comment via Disqus: |